MS Office[Illustrations]
Picture
With the help of picture option we can make our document more
attractive and more preventative so if we want our data should be more
attractive and preventative so we can do it by the help of picture option we
can insert picture easily to our documents.
Pictures can be inserted or copied into
a document from many different sources, including downloaded from Web site provider, copied from a Web page, or
inserted from a file where we save pictures.
We can also change a picture is positioned with text
within a document.
·
Insert a
picture from a Web page
·
Insert a
picture from a file
·
Change an
inline picture to a floating picture, and vice versa
1.
Open the
Microsoft Office Word 2007 document.
2.
From the Web
page, drag the picture that we want into the Word document.


Make sure the picture that you choose is not a link to
another Web page. If you draw a picture that is linked, it will be inserted in our
document as a link instead of an image.


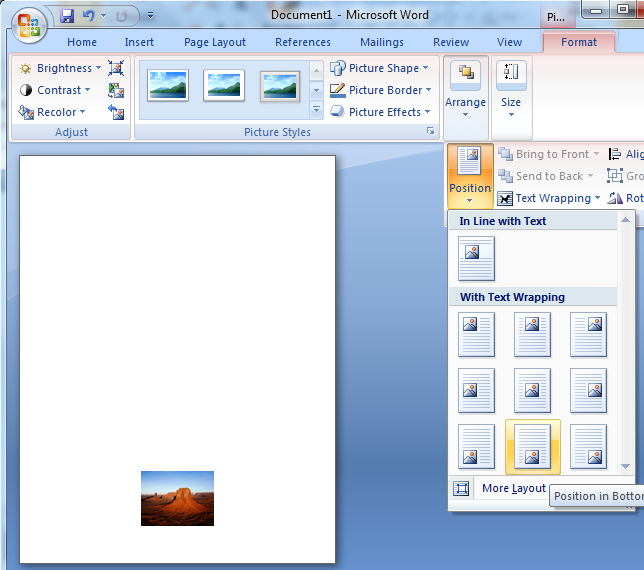
Once we will insert picture in our documents with various medium then word 2007 provide this extra facility to format our picture. with the help of it we can decorate our picture more attractive and more creative.And this format option will active when any picture will be selected otherwise format tab will not visible. Let's see by example:-


This means if our picture will not selected than format option won't appear and if pic will be selected then only format option will appear.
Let's see format tab briefly:-

Adjust:- We can adjust the relative lightness of a picture (brightness) or the difference between the darkest and lightest areas (contrast) by using the options below.

Brightness Move the Brightness slider, or enter a number in the box next to the slider.

Contrast Move the Contrast slider, or enter a number in the box next to the slider.

Recolor To apply a stylized effect, such as gray scale or sepia tone, click this button, and then click the option that you want.


Compress Picture With the help of compress picture we can reduces the size of selected picture

Change picture


Reset picture Restores the picture to the default settings for Brightness and Contrast.

brightness change how the picture looks contrast igx make picture darker make picture lighter ol picture options pp remove picture changes specify how bright a picture is specify how dark a picture is undo picture changes wd wordart xl
With the help of it we can change images according to selected shape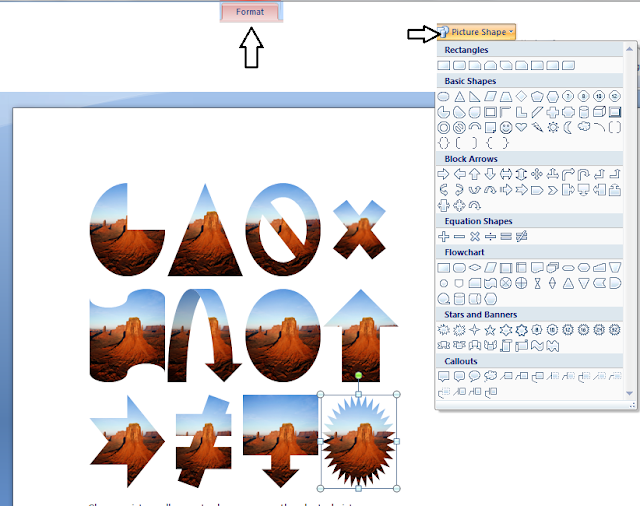
With the help of picture border we can apply different borders and colored borders
Picture border we can apply verity of border with color by the use


 With the help of picture effects we can converts our picture to the 3 D and some other effects.


Text Wrapping:--With the help of Text wrapping we can set align of the text with selected picture,Change the way text wraps around the selected objects. To configure the object so that it moves along with the text around it select in with text.


After the selection on Tight option picture allow us to write paragraph besides of pic.
Text Wrapping Options:-


Align Center:-


For uses grouping images together

Rotate:- Rotate our selected object in every direction with the help
of rotate option.


EX.


Insert a linked picture from a Web page
1.
Open the Word
document.
2.
On the Web
page, right-click the picture which we want, and then click Copy.
3.
In the Word
document, right-click where you want to insert the picture, and then click Paste.


Insert a picture from a file
- Click where you want to insert the picture.
- On the Insert
tab, in the Illustrations group, click Picture.

- Locate the
picture that you want to insert.

- Double-click the picture that you want to insert.


Note:- By default, Microsoft Word
embeds (embed: To insert information created in one program, such as a chart
or an equation, into another program. After the object is embedded, the
information becomes part of the document. Any changes you make to the object
are reflected in the document.) Pictures in a document. You can reduce the size of a file by linking (link: Used to insert a copy
of information created in one program into a Microsoft Word document while
maintaining a connection between the two files. When the information changes in
the source file, the changes are reflected in the destination document.) to a picture. In the Insert Picture
dialog box, click the arrow next to Insert, and then click Link to
File.
Format Picture


This means if our picture will not selected than format option won't appear and if pic will be selected then only format option will appear.
Let's see format tab briefly:-
Options of Format:-
- Adjust
- Picture Style
- Arrange
- Size
Adjust:- We can adjust the relative lightness of a picture (brightness) or the difference between the darkest and lightest areas (contrast) by using the options below.

Brightness Move the Brightness slider, or enter a number in the box next to the slider.

Contrast Move the Contrast slider, or enter a number in the box next to the slider.

Recolor To apply a stylized effect, such as gray scale or sepia tone, click this button, and then click the option that you want.


Compress Picture With the help of compress picture we can reduces the size of selected picture

Change picture
before we have this picture


Reset picture Restores the picture to the default settings for Brightness and Contrast.


With the help of it we can change images according to selected shape

With the help of picture border we can apply different borders and colored borders
Picture border we can apply verity of border with color by the use


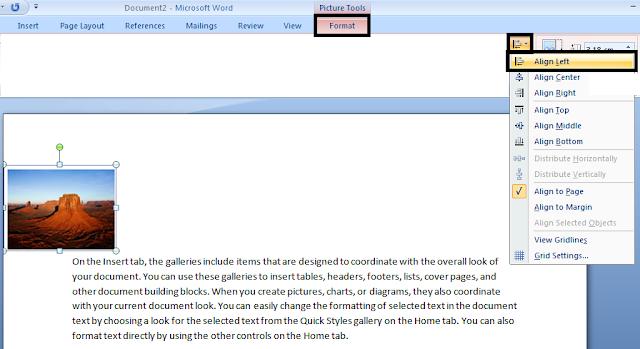
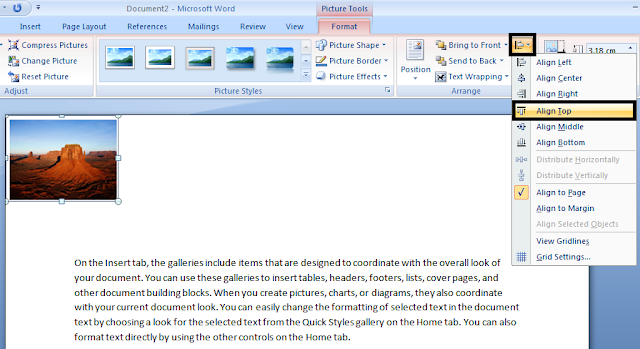
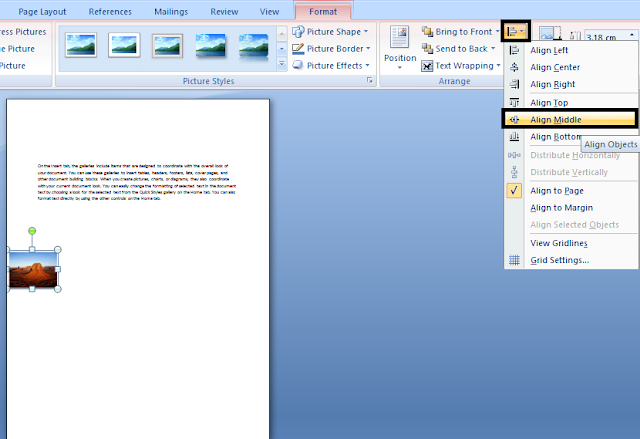
Arrange:- With the help of arrange option we can arrange the position and text wrapping of the particular picture.

 |
| Top Left Corner |
 |
| Top Middle |
 |
| Top Right Corner |
 |
| Middle Left |
 |
| Middle middle spot |
 |
| Middle Right |
 |
| Bottom Left Corner |
 |
| Bottom Middle Corner |
 |
| Bottom Right Corner |
Text Wrapping:--With the help of Text wrapping we can set align of the text with selected picture,Change the way text wraps around the selected objects. To configure the object so that it moves along with the text around it select in with text.
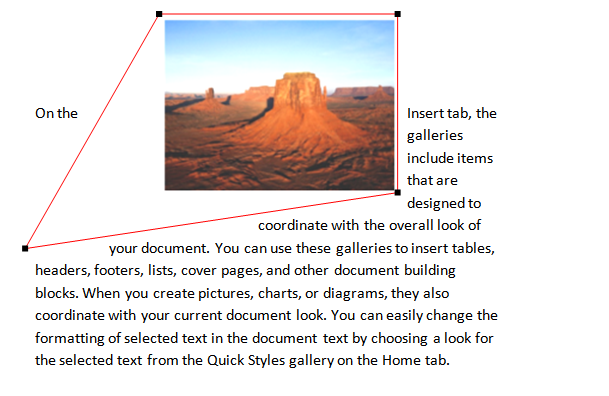
Suppose we have a picture and we want to write some paragraph
with it but picture set above of that paragraph but we want to write paragraph
beside of it but it is not allowing us to write beside of it only below and
above of the picture we can do the same so we have to format that picture and then
only we can do write anywhere of the selected picture.

In this above picture we want to write paragraph from top of
the picture but it is not allowing us so we are trying format option to
complete it.
 |
Go to Text Wrapping and select Tight option |

After the selection on Tight option picture allow us to write paragraph besides of pic.
Text Wrapping Options:-
In Line with Text:-

Square :-

Tight:-

Behind Text:-


In Front of Text:-


Top and Bottom:-


Through :-


More Layout Option:-


Before aligning the text we have to text wrapping on the image than only we can align the text

Align Left:--

Align Center:-

Align Right:-

Align Top:-

Align Middle:-

Align Bottom :-

View Grid-lines:-

Group:-- With the help of it Group objects together so that they can be treated like
single object.
Suppose I want to make an image for clip Art using shapes so
that it will become a picture for this reason I have to group shapes together and
grouped shapes will become a picture
Ex.

For uses grouping images together

 |
| Before Group |
 |
| After Group |


Crop:-With the help of crop we can remove unwanted part s of
selected picture.

 |
| Select crop option |
 |
| Dragging from right for cropping |
 |
| It's cropped now |
Height & Width:- With the help of height and width we can increase or decrease sizes of selected picture.
EX.


This post is very informative n I want to know more about the main word feature n also about macros in word
ReplyDelete