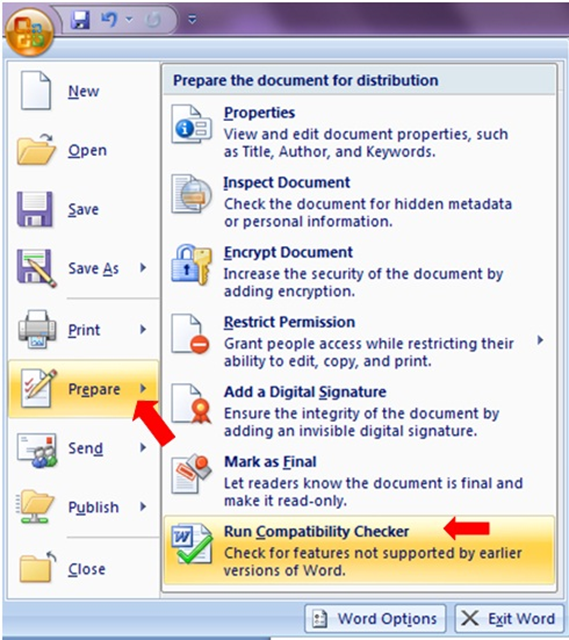
MS Office2007 [Prepare]
Prepare
Prepare:- Prepare is basically used for
the security purpose though.
We will use prepare the documents for
distributions so our documents should be secure.
Prepare has some options to use.
1.) Properties
2.) Inspect Document
3.) Encrypt Document
4.) Restrict Permission
5.) Add a Digital Signature
6.) Mark as Final
7.) Run Compatibility Checker

Properties: - Document properties, also known as metadata (metadata: Data that describes other data. For example, the words in a document are data; the word count is an example of metadata.), are details about a file that describe or identify it. Document properties include details such as title, author name, subject, and keywords that identify the document's topic or contents.
This article explains what document properties are, how you can view or change the properties for a Microsoft Office document, and how you can create custom properties for a document. Identify your documents later. You can also search for documents based on their properties. In Microsoft Office Word 2007, you can view or edit document properties easily while you work on your document content by using the Document Information Panel, which displays at the top of your document in your Office program.
Types of document properties
There are five types of document properties:
a.) Standard properties - By default, Microsoft Office documents are associated with a set of standard properties, such as author, title, and subject.
b.) Automatically updated properties - These properties include both file system properties (for example, file size or the dates when a file was created or last changed) and statistics that are maintained for you by Office programs (for example, the number of words or characters in a document). You cannot specify or change the automatically updated properties.
c.) Custom properties - You can assign a text, time, or numeric value to custom properties and you can also assign them the values yes or no. You can choose from a list of suggested names or define your own.
d.) Properties for your organization - If your organization customized the Document Information Panel, the document properties that are associated with your document may be specific to your organization.
e.) Document library properties - These are properties that are associated with documents in a document library (document library: A folder where a collection of files is shared and the files often use the same template. Each file in a library is associated with user-defined information that is displayed in the content listing for that library.) on a Web site or in a public folder.
View the properties for the current document
In Office Word 2007 we can use the Document Information Panel to view or change the document properties.
1. Click the Microsoft Office Button, point to Prepare, and then click Properties.

2. In the Document Information Panel, click the arrow next to Document Properties to select the set of properties that
you want to view (for example, Advanced
Properties).


Inspect Document:- If you plan to share an electronic copy of a Microsoft
Office Word document with clients or colleagues, it is a good idea to review
the document for hidden data or personal information that might be stored in
the document itself or in the document properties (metadata (metadata: Data that describes other
data. For example, the words in a document are data; the word count is an
example of metadata.)). Because this hidden
information can reveal details about your organization or about the document
itself that you might not want to share publicly, you might want to remove this
hidden information before you share the document with other people.
This article explains how the Document
Inspector feature in Microsoft Office Word 2007 can help you find and remove
hidden data and personal information in your documents.
-: What information can the Document
Inspector find and remove from Word documents?
In Office Word 2007, the Document
Inspector displays several different Inspectors that enable you to find and
remove hidden data and personal information that is specific to Word documents.
For a list of the different types of hidden data and personal information that
the Document Inspector can find and remove from Word documents, review the
table below.
Office Word 2007
Inspector name
|
Finds and removes
|
Comments,
Revisions, Versions, and Annotations
|
Ø Comments
Ø Revision
marks from tracked changes
Ø Document
version information
Ø Ink
annotations
|
Document
Properties and Personal Information
|
Ø Document
properties, including information from the Summary, Statistics, and Custom tabs of the Document Properties dialog box
Ø E-mail
headers
Ø Routing
slips
Ø Send-for-review
information
Ø Document
server properties
Ø Document
Management Policy information
Ø Content
type information
Ø Data
binding link information for data bound fields (last value will be converted
to text)
Ø User
name
Ø Template
name
|
Headers
and Footers
|
Ø Information
in document headers
Ø Information
in document footers
Ø Watermarks
|
Hidden
Text
|
Ø Text
that is formatted as hidden (a font effect that is available in the Font dialog box)
Ø NOTE This
Inspector cannot detect text that was hidden by other methods (for example,
white text on a white background).
|
Custom
XML Data
|
Ø Custom
XML data that might be stored within a document
|
-: How do I find and remove hidden data
and personal information in my Word documents?
You can use the Document Inspector to find
and remove hidden data and personal information in Word documents that were
created in Office Word 2007 and earlier versions. It is a good idea to use the
Document Inspector before you share an electronic copy of your Word document,
such as in an e-mail attachment.
1. Open the Word document that you want
to inspect for hidden data and personal information.
2. Click the Microsoft Office Button, click Save As, and then type a name in the File name box to save a copy of your original
document.


3. In the copy of your original document, click the Microsoft Office Button, point to Prepare, and then click Inspect Document.
4. In the Document Inspector dialog box, select the check boxes to
choose the types of hidden content that you want to be inspected Click Inspect.
5. Review the results of the inspection
in the Document
Inspector dialog box.
6. Click Remove All next to the inspection results for the
types of hidden content that you want to remove from your document.
Important: - If you remove hidden content
from your document, you might not be able to restore it so get it by clicking Undo.
Encrypt document: -
In the 2007 Microsoft Office we can
encrypt our Documents by the use of passwords. It would help to prevent other
people from opening or modifying Microsoft Office Word 2007 documents. This
article describes how to set a password to open or modify a file, and how to
change or remove the password.

Set a password for a document
To allow only authorized reviewers to view
or modify your content, you can help secure your entire document with a
password.
Ø Click Prepare
Ø then
click Encrypt Document
Ø Password
Dialog box will appear. Enter
any password which we want and click OK.
Ø When
prompted, retype your
passwords to confirm them, and then click OK.
Ø Click Save.
Now our file is password protected. If
unauthorized person trying to open with password or fake password it won’t open
till the correct password entry.
Change a password
Ø Click
the Microsoft Office Button, and then click Prepare.
Ø Click
Encrypt Document
Ø Select
the existing password, and then type a new password.
Ø Click
OK.
Ø Click
Save.
Remove a password
Ø Click
the Microsoft Office Button, and then click Encrypt Document.
Ø Password
Dialog Box will appear.
Ø Select
the password, and then press
DELETE.
.
Ø Click
OK.
Ø Click
Save.

Restrict
permission
Authors can restrict
permission for documents on a per-user, per-document, or per-group basis
(group-based permissions require Microsoft Active Directory service for group
expansion). Authors use the Permission dialog box to give users Read and Change
access, as well as to set expiration dates for content. For example, Ranjit,
the author, can give Helena permission to read a document but not make changes
to it. Ranjit can then give Bobby permission to make changes to the document
and allow him to save the document. Ranjit may also decide to limit both
Helena's and Bobby's access to this document for five days before the
permission to the document expires. For information about setting an expiration
date for a document, see Set an
expiration date for a file.
Note: - Before to restrict
permission on the file let configure IRM to our computer.
Configure your computer to use IRM
To use IRM in the 2007 Office
release, the minimum required software is Windows Rights Management Services
(RMS) Client Service Pack 1 (SP1), which can be installed on your computer
either by you or your RMS administrator. The RMS administrator can configure
company-specific IRM policies that define who can access content and what level
of editing is permitted for a document, workbook, or presentation. For example,
a company administrator might define a rights template called "Company
Confidential," which specifies that documents, workbooks, or presentations
that use that policy can be opened only by people inside the company domain.

Restrict permission:-

1. Save the document.
2. Click the Microsoft
Office Button, point to Prepare, point to Restrict
Permission, and then click Do Not Distribute.
3. Select the Restrict
permission to this document check box, and then assign
the access levels that you want for each user.
Your choices might be limited
if an administrator has set custom permission policies that individuals cannot
alter.
Permission levels
§ Read Users with Read permission can read a document, workbook, or
presentation, but they don't have permission to edit, print, or copy it.
§ Change Users with Change permission can read, edit, and save changes to a
document, workbook, or presentation, but they don't have permission to print
it.
§ Full Control Users with Full Control permission have full authoring permissions
and can do anything with the document, workbook, or presentation that an author
can do, such as set expiration dates for content, prevent printing, and give
permissions to users. After permission for a document has expired for
authorized users, the document can be opened only by the document author or by
users with Full Control permission to the document. Authors always have Full
Control permission.
To give someone Full Control
permission, click More
Options, and then in the Access Level column, click the arrow, and then click Full Control in the Change list

5. After you assign permission levels, click OK.
The Message Bar appears,
indicating that the document is rights-managed. If you need to make any access
permission changes to the document, click Change Permission.
If a document with restricted permission is forwarded to an
unauthorized person, a message appears with the author's e-mail address or Web
site address so that the individual can request permission for the document.

If the author chooses not to include an e-mail address,
unauthorized users get an error message.
Set an expiration date for a
file
1. Open the file.
2. Click the Microsoft
Office Button,
point to Prepare, point to Restrict Permission, and then click Do Not
Distribute.
3. Select the Restrict
permission to this document check box, and then click More Options.
4. Under Additional
permissions for users, select the document expires on check box, and then enters a date.
5. Click OK twice.
Use a
different Windows user account to rights-manage files
1. Open the document.
2. Click the Microsoft
Office Button, point to Prepare, point to Restrict
Permission, and then click Manage Credentials.
3. Do one of the following:
§ In the Select User dialog box, select the e-mail address for the
account that you want to use, and then click OK.
§ In the Select User dialog box, click Add, type your credentials
for the new account, and then click OK twice.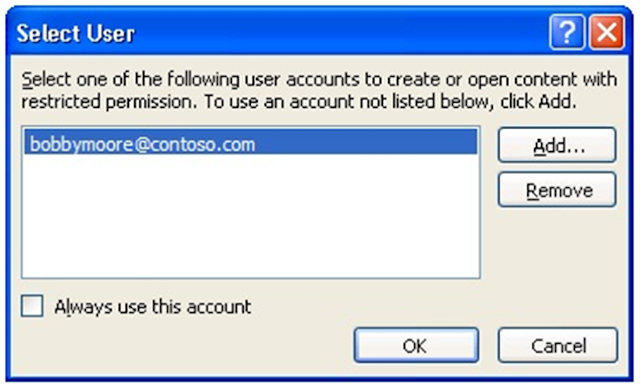

View content
with restricted permission
To view rights-managed
content that you have permissions to by using the 2007 Office release, just
open the document, workbook, or presentation.
If you want to view the
permissions you have, either click View Permission in the Message Bar or click
the button in the status bar at the bottom of your screen.

Digital
Signature
A digital signature is used
to authenticate (authenticate: The process of verifying that people and products
are who and what they claim to be. For example, confirming the source and
integrity of a software publisher's code by verifying the digital signature
used to sign the code.) Digital information — such as documents, e-mail
messages, and macros — by using computer cryptography. Digital signatures
help to establish the following assurances:
To make these assurances, the
content must be digitally signed by the content creator, using a signature that
satisfies the following criteria:
The 2007 Microsoft Office
system programs detect these criteria for you, and alert you if there is a
problem with the digital signature.


Mark as
Final:-
Before you share an
electronic copy of a Microsoft Office document with other people, you can use
the Mark as Final command to make the document read-only and prevent changes to
the document. When a document is marked as final, typing, editing commands, and
proofing marks are disabled or turned off and the document becomes read-only.
Additionally, the Status property of the document is set to Final. The Mark as
Final command helps you communicate that you are sharing a completed version of
a document. It also helps prevent reviewers or readers from making inadvertent
changes to the document.
Ø The Mark as Final command is not a security feature. Anyone who
receives an electronic copy of a document that has been marked as final can
edit that document by removing Mark as Final status from the document.
Ø Documents that have been marked as final in a 2007 Microsoft
Office system program will not be read-only if they are opened in earlier
versions of Microsoft Office programs.
Mark
document as final
1. Open the document that is marked as final.
2. Click the Microsoft
Office Button,
point to Prepare, and then click Mark
as Final.

Enable
editing for a document that is marked as final
The Mark as Final command is selected in documents that have been marked as final.
If you want to edit a document that is marked as final, you can click the Mark as Final command.
You can also recognise that a
document has been marked as final by looking for the Mark as Final icon in the
status bar.
1. Open the document that is marked as final.
2. Click the Microsoft
Office Button, point to Prepare, and then click Mark
as Final.

Run
Compatibility Checker
Compatibility Checker:-
The Compatibility Checker
lists elements in our document that aren't supported or will behave differently
in Word 97-2003 format. Some of these features will be permanently changed and
won't be converted to Microsoft Office Word 2007 elements even if we later
convert the document to Office Word 2007 format.
In the Compatibility Checker,
we can review a summary of elements that behave differently in previous
versions of Word and then either click Continue to save the document in Word 97-2003 format or click Cancel.
Building Blocks
Citations and bibliographies
Content controls
Embedded objects
Equations
Smart Art graphics
Tabs
Text boxes
Tracked moves
How to open compatibility
Checker?
Ø Open the document that is saved in Old Version like 97-2003.
Ø Then it will open with compatibility Mode.
Ø If it is not saved on other version then it will show some window.
Ø Click the Microsoft Office Button, and then click Prepare.
Ø Click Run Compatibility Checker
Ø Click OK.
Ø Click Save.

By the
help of prepare option we can highly protect our documents.
This is all about prepare.


Comments
Post a Comment