MS Office[Paragraph]
Paragraph
This group describes about
the paragraph editing and formatting. It has some options


Add a border to some text

Customize your text’s border


This group describes about
the paragraph editing and formatting. It has some options

- Bullet
- Number
- Multilevel List
- Increase Indent
- Decrease Indent
- Sort
- Show/Hide
- Left Align
- Center Align
- Right Align
- Justify
- Line Spacing
Bullet
If we are making a document and we
want to represent it in the list then we can use Bullet Library includes symbol
and picture bullet styles.
1. Select the items to which you want to
add picture bullets or symbols.
2. On the Home tab, in the Paragraph group, click the arrow next to Bullets.
Example:-

If you don't see the style that you
want in the library, you can define a new bullet style.
- · Select the items to which you want to add picture bullets or symbols.
- · On the Home tab, in the Paragraph group, click the arrow next to Bullets.
- · Click Define New Bullet, and then click Symbol or Picture.
- · Click any symbol or picture that you want to use, and then click OK twice.
After you create a bullet-ed item,
each time you press ENTER, another bullet-ed item is
automatically added until you press ENTER twice.
Example:-
If a friend or
colleague sends you a document with a bullet style that you particularly like,
you can add it to your own Bullet Library, where it will always be available
for use in a document.
1.Open the
document that contains the bullet that you want to add to your Bullet Library.
2.On the Home tab, in the Paragraph group, click the arrow next to Bullets.
3.Under Document Bullets, right-click
the bullet style that you want to add to the Bullet Library, and then click Add to Library.
Remove
On the Home tab, in the Paragraph group, click the arrow next to
Bullets.
1. Under Bullet Library, right-click the
bullet style that you want to remove from the Bullet Library, and then click Remove.
- · Bullets in a document are always available for addition to the Bullet Library.
- · If you remove a bullet from the Bullet Library and the bullet is available in the Document Bullets area, you can easily add the bullet back to the Bullet Library.

Numbering
If we are
making a document and we want to represent it in the list manner with numbers
then we can use Numbers Library.
1. Select
number format in the list that you want to change.
By clicking a
number in an automatically recognized numbered list, you select the entire
list.
2. On the Home tab, in the Paragraph group, click Numbering.
To make the list, click Numbering
To make the list, click Numbering
Example:-

Choose
a new numbering format
1. Click a number in the list that you
want to change.
In
a list, we can change the formatting one level at a time by clicking one number
at that level in the list.
2. On the Home tab, under Paragraph, click the arrow next
to Numbering.
3. Click the numbering list format that
you want in the Numbering
Library.
Example:-
In the bullets I showed
how we can add new bullets same in Numbering as well as Multilevel list also.
we can try it by the help
of bullets option.
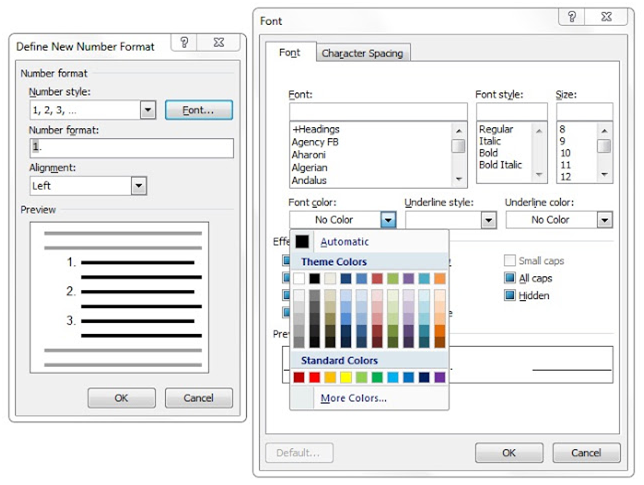
Define New Numbering
If you don't see the style
that you want in the library, you can define a new bullet style.
- Select
the items to which you want to Numbering
- On
the Home tab, in the Paragraph group,
click the arrow next
to Numbering.
- Click Define
New Number Format, and then click to Numbers Style.
- Click OK twice.


Change the font for
bullets or numbers in a list
You can change the text
formatting of numbers in a list without making changes to the text in the
list.
For example, you can
format numbers with a different font color than the text in the list.
1. Click
a number in a list.
All
the numbers in the list are selected.
2. On
the Home tab, in the Font group, make the changes that you want.
For
example, click the arrow next to Font
Color, and then click the color that you want.
The
Numbers in my list jump around
In
Microsoft Office Word 2007, you can easily change the level of a list item.
1. Click the number that has moved
out of position.
2. On the Home tab, under Paragraph, click the arrow next
to Numbering.
3. Point to Change List Level, and then
click the level that you want.
Create a multilevel list
A
multilevel list shows the list items at different levels rather than at one
level.

1. Click where you want to begin your
list.
2. On the Home tab, in the Paragraph group, click the arrow next to Multilevel List.
3. Click a multilevel list style in the
gallery of styles.
4. Type your list. Press the TAB key or
SHIFT+TAB to change levels.
Arrows
indicates tabs means if we want to create a multi level list than first set it
hierarchy with tabs we can enter one or more tabs if we are entering one or
more tab then we will get one or more hierarchy.


Create
a new multilevel list style to add to the gallery
If
the multilevel list styles in the gallery aren't what you are looking for, you
can create and define a new multilevel list style. You can use your new list
style each time you begin a new multilevel list in a document. The new list
style is added automatically to the gallery of list styles.
1. On the Home tab, in the Paragraph group, click the arrow next to Multilevel List.
2. Click Define New Multilevel List.
Beginning
with level 1, enter your number format, font, and position choices. Continue to
define each level that you want to use in your multilevel list.
NOTE When
you define a multilevel list style, you can mix numbers and bullets in the same
list. For example, in the Number
style for this level box, you
can scroll down and click a bullet style for a particular level.
3. Click OK.
The
multilevel list style that you defined is automatically set as the current
multilevel list style.

Indent paragraphs
Indentation determines the
distance of the paragraph from either the left or the right margin. Within the
margins, you can increase or decrease the indentation of a paragraph or group
of paragraphs. You can also create a negative indent (also known as an out
dent), which pulls the paragraph out toward the left margin. You can also
create a hanging indent, in which the first line of the paragraph is not
indented, but subsequent lines are.
Increase or decrease the
left indent of an entire paragraph
1. Select the paragraph that you want to
change.
2. On the Home tab, in the Paragraph group, click the arrows next to Increase Indent Left or Right to increase the left or right indentation
of the paragraph. 


Sort
You can quickly and easily
alphabetize the text of a one-level bullet ed or numbered list.
1. Select the text in a bullet ed or
numbered list.
2. On the Home tab, in the Paragraph group, click Sort.

3.
In the Sort Text dialog box, under Sort by, click Paragraphs and Text,
and then click either Ascending or Descending.
Show or hide
The Show/Hide button will not hide all formatting
marks if you selected certain marks, such as paragraph marks or spaces, enters
and tabs to be displayed at all times.
Show or hide formatting
marks
1) On the Home tab, in the Paragraph group, click Show/Hide.

off selected formatting
marks
2) On the Home tab, in the Paragraph group, click again Show/Hide.
Example:-

Align the text left
1.
Select the text that you want to align.
2.
On the Home tab, in the Paragraph group, click Align Left
Center
the text
1.
Select the text that you want to center.
2.
On the Home tab, in the Paragraph group, click Center.
Align the text right
1.
Select the text that you want to align.
2.
On the Home tab, in the Paragraph group, click Align Right.
Justify the text
You can justify the text,
which might make the last line of text in a paragraph considerably shorter than
the other lines.
1.
Select the text you want to justify.
2.
On the Home tab, in the Paragraph group, click Justify.
Example:-
Left Alignment
Center Alignment
Right Alignment
Before Justify
After Justify
Change the line spacing
If a line contains a large
text character, graphic, or formula, Microsoft Office Word increases the
spacing for that line.
To space all lines evenly
within a paragraph, use exact spacing and specify an amount of space that is
large enough to fit the largest character or graphic in the line. If items
appear cut off, increase the amount of spacing.
1. Select the paragraph for which you
want to change the line spacing.
2. On the Home tab, in the Paragraph group, click Line Spacing.
1. Do one of the following:
§ To apply a new setting, click the
number of line spaces that you want.
For example, if you click 2.0, the selected text is
double spaced.
§ To set more precise spacing
measurements, click Line
Spacing Options, and then select the options that you want under Spacing.
Line
spacing options
Single This
option accommodates the largest font (font: A graphic design applied to
all numerals, symbols, and alphabetic characters. Also called type or typeface.
Arial and Courier New are examples of fonts. Fonts usually come in different
sizes, such as 10 point, and various styles, such as bold.) in that line, plus a small amount of
extra space. The amount of extra space varies depending on the font that is
used.
1.5 lines This
option is one-and-one-half times that of single line spacing.
Double This
option is twice that of single line spacing.
At least This
option sets the minimum line spacing that is needed to fit the largest font or
graphic on the line.
Exactly This
option sets fixed line spacing that Microsoft Office Word does not adjust.
Multiple This
option sets line spacing that is increased or decreased from single spacing by
a percentage that you specify. For example, setting line spacing to 1.2 will
increase the space by 20 percent.
Example:-
|
Before
Applying line Spacing
|
|
After Applying line Spacing
|
Change the color of text
In Microsoft Office
Word 2007, you can apply a format to selected text, or you can quickly and
easily format an entire document to give it a professional and modern look by
applying a document theme. A document theme is a set of formatting choices that
can include a color scheme (a set of colors), a font scheme (a set of heading
and body text fonts), and an effects scheme (a set of lines and fill effects).
Example:-
Before
Shading color

After
Shading color

Borders
If you want to add
borders around the paragraph where your cursor is located, click the Borders button( ) to
add the current default borders (the original default or the last border style
that you selected). If you want to select a border style that differs from the
current default border style, click the small arrow on the Borders button,
and select one of the border styles displayed or click Borders and
Shading to define your own custom borders. If you want to add borders
around multiple paragraphs, select the applicable paragraphs before you click
the Borders button or the small arrow on it.
) to
add the current default borders (the original default or the last border style
that you selected). If you want to select a border style that differs from the
current default border style, click the small arrow on the Borders button,
and select one of the border styles displayed or click Borders and
Shading to define your own custom borders. If you want to add borders
around multiple paragraphs, select the applicable paragraphs before you click
the Borders button or the small arrow on it.
Add a border to some text
When you add a border to a picture, or put a border
around a table, or even add a border to an individual page, you can really
make your content stand out.
Same goes with the text in your documents. You can choose to
border individual words, lines, or even whole paragraphs. Just how plain or
fancy you want to make those borders is up to you.
1. Select a word, line, or paragraph.
2. Click Home > Borders >the
arrow next to Borders.

Customize your text’s border
1. After
you’ve selected your text and found the basic type of border you’d like, click
the arrow next to Borders button again and then click Borders
and Shading.
The box that opens
shows you all the choices you can make for your border: Setting, style, color,
width.

NOTE Make sure that the Apply
to box has the correct
setting: Text or Paragraph. You can
experiment to find what
works for you.
You can change the border around your text at any time or
you
can remove the border from your text altogether.


It's all about Paragraph.


Comments
Post a Comment